

how 2 fit vectra oem xenons
2 posters

how 2 fit vectra oem xenons
![]() by admin-1 Tue Jan 12, 2010 2:40 pm
by admin-1 Tue Jan 12, 2010 2:40 pm
How to retro fit xenon lights without auto levelling
What you will need
CDX/GSI style xenon light clusters – drivers and passenger side
2 igniter’s packs
Inner drivers wing bracket and loom (available from VX about £3
Xenon headlight plugs and some loom on them
Crimping set
Some spare time and patience!
8mm socket
Torx male set
Right first of all, you will need to remove or drop your front bumper, there are two screws in the wheel arch, one on each side of the car, unscrew these, then you should be able to push the bumper edges towards the front of the car, so the edges unclip off the brackets…
Now, unscrew the three screws on the front grill.
Now unscrew the screws that hold the headlights in, you should be able to see these now you have taken the grill off
Now try and gently pull the front bumper towards you, so it comes off the black foam stuff, and once you have done this it will give you more access to the other screws holding the lights on
Now you want to unscrew the screws that on on the side of the headlights, in the bumper, as long as u have lowered the front bumper you will be able to get to them easily,
Now unscrew the screws on the top of the headlights, once you have done that you should be able to freely move the headlights about. But before you remove them, make sure you have taken out the indicator bulbs and the plugs on the back of the lights.
Now with the lights removed, you should be able to see the plugs that went onto the back of them, get a pair of wire cutters, and cut them as close to the plug as you can leaving plenty of wire coming from the loom attached to the car
Now, with both standard headlights removed, and all the plugs from each side cut off, get the plugs that go onto the back of the xenon lights, and strip back some of the rubber wire coating, so you have at least 1cm of exposed wire, on the wire form the back of the xenon plugs and the wire coming out of the car
Now, all you have to do is connect the same colour wire that’s coming out of the car loom, to the corresponding coloured wire on the back of the plug.
Now once you have done that, that’s the hardest part, so it gets easier now. Now for the igniters, the passenger side one should already be attached to the bottom of the passenger light, so all you have to do is plug the plug you have attached to the car loom, to the back of the xenon light, and then your should be able to turn your headlights on and it should light up! So that’s one done. Then all you have to do is a reverse of taking the headlight out….
Now for the drivers side one.
Do the same with the wiring, attach the same coloured wires to the plug…..then the igniters and wing bracket you have, attach the igniters to the bracket, and screw it up, then place it into the wing behind the air box kind of….so the wiring loom sticks forward…then attach the plug to the right side of the light, and the loom with the plug you have attached to the left side of the light, then go and check it works by turning your headlights on, and hey presto it should
So now all you have to do is screw the headlight in again, replace the bumper, and off you go.
You should now have xenon lights fitted

admin-1- Posts : 169
Points : 276
Join date : 2010-01-05
Location : not telling you
Re: how 2 fit vectra oem xenons
![]() by vauxstar Sat Oct 16, 2010 10:53 am
by vauxstar Sat Oct 16, 2010 10:53 am
here is a wiring diagram and connections info for you to wire them in correctly so that the auto levelers work.
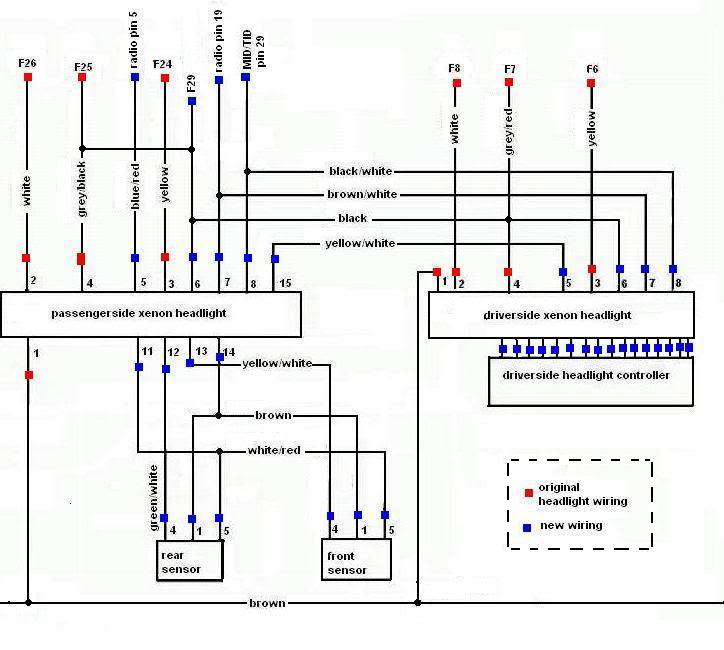
on your car loom you have YELLOW, WHITE, BROWN, GREY/RED on the drivers side. and YELLOW, WHITE, BROWN, GREY/BLACK on passenger side.
connect all of the relavent coulours together but::--
as it says in the picture to connect the black wire from pin 6 on the headlght to the GREY/RED on drivers side and connect the black wire from pin 6 to the GREY/BLACK on the passenger side.
so you should endup with the basic pic below,

all the rest of the wiring on the plug should be isolated up and tucked away as its not needed.
on your car loom you have YELLOW, WHITE, BROWN, GREY/RED on the drivers side. and YELLOW, WHITE, BROWN, GREY/BLACK on passenger side.
connect all of the relavent coulours together but::--
as it says in the picture to connect the black wire from pin 6 on the headlght to the GREY/RED on drivers side and connect the black wire from pin 6 to the GREY/BLACK on the passenger side.
so you should endup with the basic pic below,
all the rest of the wiring on the plug should be isolated up and tucked away as its not needed.
vauxstar- super moderator

- Posts : 138
Points : 219
Join date : 2010-09-13
Age : 44
Location : on the mothership
» How 2 - Vectra 3-Pipe Mod
» my vectra gsi
» vectra sri 2.6 project
» vectra gsi estate
» vectra fog lamps
» my vectra gsi
» vectra sri 2.6 project
» vectra gsi estate
» vectra fog lamps
Permissions in this forum:
You cannot reply to topics in this forum|
|
|